
Sass 进阶
前言
日常开发主要使用 Sass 语法编写样式,所以这里记录 Sass 几个好用的技巧。
控制指令
在编写 @mixin 和 @function 时提供逻辑判断。
@if
$boolean: true !default;

@mixin simple-mixin {
    // #{} 类似 ES6 字符串模板的变量(${})
    @if $boolean {
        @debug "$boolean is #{$boolean}";
        display: block;
    } @else {
        @debug "$boolean is #{$boolean}";
        display: none;
    }
}
.selector {
    @include simple-mixin;
}
@for
语法1:从 start 遍历到 end,包含 end 的值。
@for $var from <start> through <end>

语法2:从 start 遍历到 end,不包含 end 的值。
@for $var from <start> to <end>
$class-name: for !default;

@for $i from 0 through 4 {
    .#{$class-name}-#{$i} {
        font-size: 32px + $i;
        color: red;
    }
}

@for $i from 0 to 4 {
    .#{$class-name}-#{$i} {
        font-size: 32px + $i;
        color: red;
    }
}
@each
基础:
$list: red green yellow black orange;
@mixin list-color {
    @each $var in $list {
        .#{$var} {
            color: $var;
        }
    }
}

.item {
    @include list-color;
}
编译后:
.item .red { color: red; }
.item .green { color: green; }
/* ...省略 */
结合上面的 @for 的写法:
.item {
    @for $var from 0 through 4 {
        &.#{$class-name}-#{$var} {
            font-size: 32px + $var;
        }
    }
    @include list-color;
}
编译后:
.item.for-0 {}
.item .red {}

.item.for-1 {}
.item .green {}
/* ...省略 */
@while
只要 @while 后面的条件为 false 就会停止循环。
$index: 4;
$index-width: 10px;

@while $index > 0 {
    .box-#{$index} {
        width: $index-width + $index;
    }
    $index: $index - 1;
}
@extend
一个元素使用的样式与另一个元素完全相同,但又添加了额外的样式。使用 @extend 告诉 Sass 将一个选择器下的所有样式继承给另一个选择器。
基础
.clearfloat {
    *zoom: 1;
    &::after {
        font-size: 0;
        display: block;
        visibility: hidden;
        clear: both;
        height: 0;
        content: ' ';
    }
}

.box {
    @extend .clearfloat;
}
多重延伸
.dis-flex {
    display: flex;
}

.clearfloat {
    *zoom: 1;
    &::after {
        font-size: 0;
        display: block;
        visibility: hidden;
        clear: both;
        height: 0;
        content: ' ';
    }
}

.box {
    @extend .dis-flex;
    @extend .clearfloat;
}
也可以使用逗号隔开:@extend .dis-flex, .clearfloat;。
注意
此外需要注意的是,@extend 命令无法用在其他 @ 命令中,例如用在 @media 命令中。当你在上面定义 .clearfloat 类时,在 Media Queries 代码里面就无法扩展 .clearfloat 类。但是你可以在 Media Queries 里面再定义一个 .clearfloat 然后扩展一下。
继续延伸
当一个选择器延伸给第二个后,可以继续将第二个选择器延伸给第三个。
.error {
    border: 1px #f00;
    background-color: #fdd;
}

.seriousError {
    @extend .error;
    border-width: 3px;
}

.criticalError {
    @extend .seriousError;
    position: fixed;
    top: 10%;
    bottom: 10%;
    left: 10%;
    right: 10%;
}
按需求输出的 @extend
像之前说的,使用 @extend 需要规划好可复用的类放在上面,然后再在下面 @extend 调用。这样,我们的可复用部分就会编译输出到 CSS 中,但这些代码可能是无意义的,我们并不想使其编译出现在 CSS 文件中,那么就可以使用 % 符号来实现。
#context a%extreme {
    color: blue;
    font-weight: bold;
    font-size: 16px;
}

.notice {
    @extend %extreme;
}
编译后:
#context a.notice {
    color: blue;
    font-weight: bold;
    font-size: 16px;
}
另一个例子:
%flex-box {
    display: flex;
    flex-direction: column;
    justify-content: center;
    align-items: center;
}
.flex-a {
    @extend %flex-box;
    width: 100px;
    height: 100px;
}
.flex-b {
    @extend %flex-box;
    width: 200px;
    height: 200px;
}
编译后:
.flex-a, .flex-b {
    display: flex;
    flex-direction: column;
    justify-content: center;
    align-items: center;
}
.flex-a {
    width: 100px;
    height: 100px;
}
.flex-b {
    width: 200px;
    height: 200px;
}
多个选择器运用了相同的 %placeholder 也只会输出一次代码。没有引用的 %placeholder 是不会输出任何 CSS 代码。
@mixin
基础
@mixin 定义的是一个片段,这个片段可以是类似变量的一段文字一条属性,也可以是一整个选择器和内容,也可以是一个选择器的一部分 CSS 代码。此外还可以传递参数,通过参数生成不同代码。它需要配合 @include 命令来引用这段代码,类似复制的效果。@mixin 定义的内容,不会编译输出。
@mixin font($color, $fontSize: 14px) {
    color: $color;
    font-size: $fontSize;
}

p { @include font(red); }
h1 { @include font(blue, 20px); }
编译后:
p { color: red; font-size: 14px; }
h1 { color: blue; font-size: 20px; }
传递多参数
需要在参数后面加上三个点,表示这个参数可能包含多条属性:
@mixin box-shadow($shadows...) {
    -moz-box-shadow: $shadows;
    -webkit-box-shadow: $shadows;
    box-shadow: $shadows;
}

.shadow {
    height: 200px;
    @include box-shadow(0px 4px 5px #666, 2px 6px 10px #999);
}
此外,多值参数还可以用在 @include 传參的时候,分解某个变量值,例如:
@mixin colors($text, $background, $border) {
    color: $text;
    background-color: $background;
    border-color: $border;
}

$values: #ff0000, #00ff00, #0000ff;
.box1 {
    @include colors($values...);
}

$value-map: (text: #00ff00, background: #0000ff, border: #ff0000);
.box2 {
    @include colors($value-map...);
}
向 @mixin 传递内容
对于编写响应式不要太友好,例如:
#logo {
    font-size: 32px;
}
@mixin iphone5 {
    @media only screen and (min-device-width : 320px) and (max-device-width : 568px) {
        @content;
    }
}
@include iphone5 {
    #logo {
        font-size: 12px;
    }
}
@content 是即将插入 @include 中的内容。
组织 Sass 文件
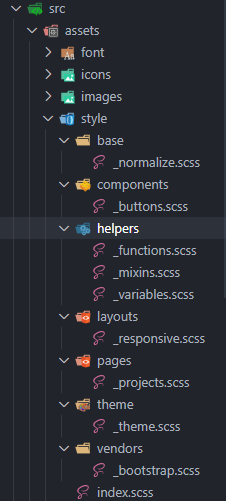
base
该文件夹包含初始化模板相关的文件。
components
该文件夹包含组件样式相关的文件。
helpers
该文件夹包含 Sass 的工具和帮助之类的样式文件。
layouts
该文件夹包含布局相关的文件。比如说“header”,“footer”,“网格布局”和“响应式布局”等。
pages
如果你需要针对一些页面写特定的样式,我想将他们放在 pages/ 文件夹中是非常酷的,并且以页面的名称来命名。
theme
该文件夹包含主题样式的相关文件。
vendors
主要用来包含来自外部的库和框架的 CSS 文件。
限制嵌套
原则如下:
- 嵌套永远不要超过三个层级;
- 确保输出的CSS简洁、可重用;
- 使用嵌套是很有意义的,而不是默认选项;